Welcome to our guide on DIY soundproofing for your home studio – where we’ll share with you some valuable tips and tricks.
So, picture this: you’re in the zone, creating music or recording vocals, but suddenly your flow is interrupted by unwanted external noise. Frustrating, right? That’s where soundproofing comes in to save the day.
In this article, we will explore practical methods to transform your space into a sanctuary of sonic isolation. By assessing your studio area and identifying problem areas, sealing air leaks and gaps, using effective soundproofing materials, building a floating floor, installing soundproof doors and reducing noise from HVAC systems – you’ll be well on your way to achieving that pristine audio environment.
But wait! We don’t stop there. We also delve into the world of controlling reflections and echoes as well as addressing windows as potential sources of unwanted noise infiltration. And don’t worry; we’ve got you covered when it comes to testing and adjusting for optimum results.
So grab your tools and let’s dive into the art of DIY soundproofing – because every musician deserves their own little piece of acoustic paradise!
Key Takeaways of Diy Soundproofing For Your Home Studio
- Assess studio area and identify problem areas
- Seal air leaks and gaps for an acoustically controlled environment
- Use soundproofing materials like acoustic panels, curtains, and double-layered drywall
- Consider building a floating floor for enhanced sound insulation and acoustic performance
Assess Your Space and Identify Problem Areas
Before you start soundproofing your home studio, take a moment to assess the space and figure out which areas might be causing problems. This step is crucial in determining the best soundproofing techniques and solutions for your specific needs.
Start by inspecting the walls, floors, and ceilings for any cracks or gaps that could let sound in or out. Look for windows that may not be properly sealed or doors that have significant gaps around them. These problem areas can greatly impact the effectiveness of your soundproofing efforts.
Once you have identified these weak spots, you can then move on to sealing air leaks and gaps to create a more acoustically controlled environment. By addressing these issues first, you’ll lay a solid foundation for effective soundproofing throughout your home studio setup.
Seal Air Leaks and Gaps
To effectively soundproof your home studio, make sure you thoroughly seal any air leaks and gaps as if you’re trying to stop water from seeping through a crack in a dam. Proper sealing techniques are crucial for creating an acoustically tight space.
Here are four DIY soundproofing tricks to help you seal those pesky air leaks:
- Weatherstripping: Apply adhesive-backed weatherstripping tape around windows and doors to create a tight seal.
- Caulking: Fill in any cracks or gaps with acoustic caulk to prevent air leakage.
- Outlet Insulation: Install foam gaskets behind electrical outlet covers to eliminate air leaks.
- Door Sweeps: Attach door sweeps at the bottom of doors to block noise from entering or escaping.
By implementing these sealing techniques, you can significantly reduce unwanted noise transmission in your home studio.
In the next section, we’ll explore how to use soundproofing materials to further enhance your studio’s acoustics without compromising its aesthetics or functionality.
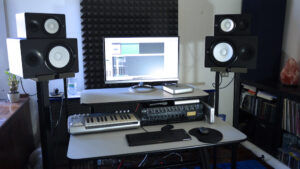
Use Soundproofing Materials
Enhance the acoustics of your home studio by incorporating soundproofing materials that create a visually appealing and functional space.
There are various soundproofing techniques available that can help minimize external noise and improve the overall quality of sound within your studio.
One cost-effective solution is to use acoustic panels made from materials such as foam or fiberglass. These panels can be easily installed on walls, ceilings, and even doors to absorb excess sound waves and reduce echo.
Another option is to use soundproof curtains or blankets, which can be hung around windows or doors to block out unwanted noise.
Additionally, consider using a double layer of drywall with green glue sandwiched in between for added sound insulation.
By utilizing these soundproofing materials, you can create an environment that is conducive to recording music or producing audio content without any distractions.
As we move forward into the next section about ‘build a floating floor’, it’s important to continue implementing these effective techniques for optimal soundproofing results.
Build a Floating Floor
Building a floating floor is like creating a musical island that isolates your studio from vibrations and disturbances. This DIY soundproofing technique offers numerous benefits, including enhanced sound insulation and improved acoustic performance. By installing a floating floor, you create an additional layer of separation between your studio space and the rest of your home. The construction involves building a subfloor using resilient materials such as rubber or cork, which are effective at absorbing and dampening vibrations.
On top of the subfloor, you can add layers of mass-loaded vinyl or soundproof underlayment for further sound isolation. This method prevents impact noise transmission and ensures that external sounds do not interfere with your recordings. To learn more about how to enhance the soundproofing in your home studio, let’s explore the next section on ‘soundproof doors.’
| Pros | Cons | Tips |
|---|---|---|
| Enhanced sound insulation | Requires careful installation | Use high-quality materials |
| Improved acoustic performance | Increased cost compared to regular flooring | Follow proper installation techniques |
| Prevents impact noise transmission | May slightly reduce ceiling height | Seek professional advice if unsure |
Let’s now move on to understanding how ‘soundproof doors’ can further improve the isolation in your home studio.
Soundproof Doors
Make sure you invest in soundproof doors to effectively isolate your home studio from external noise and create a professional recording environment. Soundproof door installation is crucial for minimizing sound leakage and maintaining the integrity of your recordings.
Here are four key factors to consider when choosing and installing soundproof doors:
- Mass: Opt for solid, heavy doors that can block sound waves effectively.
- Seals: Look for doors with tight seals to prevent air gaps that can allow sound to leak through.
- Frame: Use a sturdy, well-insulated frame to further enhance the door’s soundproofing capabilities.
- Acoustic glass: Consider using double-pane or laminated glass on any windows in the door.
By carefully selecting and properly installing soundproof doors, you can significantly reduce external noise interference in your home studio.
This leads us into the next section where we will discuss how to create a soundproof room within a room without compromising structural integrity.
Create a Soundproof Room Within a Room
Now that we’ve discussed soundproof doors, let’s move on to the next step in creating a soundproof home studio: creating a soundproof room within a room.
This technique involves constructing an additional layer of walls and ceilings inside your existing space to effectively block out external noise and vibrations. By decoupling these inner walls from the outer ones, you can prevent sound from traveling through structural elements.
To achieve this, use materials such as mass-loaded vinyl, resilient channels, and acoustic insulation to enhance the soundproofing capabilities of the room. The construction process requires careful planning and attention to detail, as any gaps or weak points can compromise the effectiveness of the soundproofing techniques.
Now that we’ve learned how to create a soundproof room within a room, let’s explore ways to reduce noise from HVAC systems in our home studio setup.
Reduce Noise from HVAC Systems
One way to keep your home studio cool without disturbing noise is by taming the HVAC beast. Soundproofing techniques and noise reduction methods can be employed to minimize the noise generated by heating, ventilation, and air conditioning (HVAC) systems.
First, ensure that all ducts are properly sealed to prevent any air leakage that may contribute to noise transmission.
Additionally, installing acoustic insulation around the ductwork can help absorb sound waves and reduce their propagation into your studio space.
Another effective method is using vibration isolation mounts or hangers to isolate the HVAC equipment from the surrounding structure, minimizing vibrations and subsequently reducing noise transfer.
By implementing these soundproofing techniques and noise reduction methods, you can create a quieter environment in your home studio for optimal recording conditions.
In the next section, we will consider soundproofing windows as another important aspect of creating a sound-isolated space.
Consider Soundproofing Windows
When considering soundproofing windows, there are two key points to keep in mind. First, installing double-glazed or laminated windows can significantly reduce noise transmission. These types of windows have multiple layers of glass that provide additional insulation and help to block out external sounds.
Second, using soundproofing film or window inserts can also be an effective solution. Soundproofing film is a thin layer that’s applied directly onto the glass surface, while window inserts are panels that fit snugly inside the window frame and create an extra barrier against noise.
Install double-glazed or laminated windows
Enhance the soundproofing of your home studio by installing double-glazed or laminated windows for a quieter and more professional recording environment. Double-glazed windows consist of two panes of glass with an air gap in between, which helps to reduce noise transmission. The added layer of insulation provided by the double glazing can effectively block out external sounds and prevent sound leakage from your studio.
Laminated windows, on the other hand, feature a layer of transparent plastic sandwiched between two glass panes. This design not only enhances soundproofing but also provides additional security and safety benefits.
To further improve the soundproofing of your windows, consider using soundproof curtains or acoustic window panels. These accessories are specifically designed to absorb and dampen sound waves, reducing echo and reverberation within your studio space. Additionally, they can help to block out external noise sources such as traffic or construction.
Now let’s explore how you can use soundproofing film or window inserts to enhance the effectiveness of your window soundproofing measures.
Use soundproofing film or window inserts
When it comes to soundproofing your home studio, every little bit helps. In our previous discussion, we explored the benefits of installing double-glazed or laminated windows. Now, let’s dive into another effective method: using soundproofing film or window inserts.
Soundproofing film is a thin layer of material that adheres directly to your existing windows. It acts as an additional barrier against noise transmission, reducing the amount of sound that enters or leaves your studio space.
Window inserts, on the other hand, are removable panels made from materials like acrylic or glass that fit snugly inside your window frames.
Both soundproofing film and window inserts can significantly improve the acoustic performance of your studio by blocking out external noise and preventing sound leakage. To further enhance the sound quality in your space, consider incorporating other elements such as soundproofing curtains and acoustic panels.
Now that we’ve covered ways to minimize external noise intrusion, let’s move on to controlling reflections and echoes in our upcoming section.
Control Reflections and Echoes
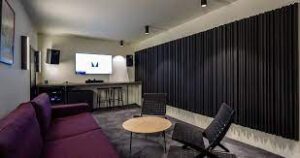
To control reflections and echoes in your home studio, you can easily install acoustic panels on the walls to absorb unwanted sound, even if you’re concerned about the cost. Acoustic panels are designed to reduce sound reflections and echo by absorbing sound waves that bounce off hard surfaces.
Here are three benefits of using acoustic panels:
- Improved sound quality: Acoustic panels help create a more balanced and accurate listening environment by reducing flutter echoes and standing waves.
- Enhanced recording capabilities: By reducing room resonances, acoustic panels minimize unwanted reverb, allowing for cleaner recordings with better clarity.
- Aesthetically pleasing: With various designs and colors available, acoustic panels not only improve the acoustics of your studio but also add a touch of style.
Now that you have installed your acoustic panels to control reflections and echoes in your home studio, it’s time to test and adjust their placement to achieve optimal results.
Test and Adjust
Now that we’ve installed those stylish acoustic panels, it’s time to truly transform our home studio by testing and adjusting their placement for optimal sound quality.
Testing the effectiveness of our soundproofing efforts is crucial to ensure that we have achieved the desired results. To do this, we can use various test equipment such as a decibel meter or a sound level analyzer to measure the levels of noise and reflections in our studio space.
By strategically moving the panels around and experimenting with different configurations, we can fine-tune the acoustics until we achieve the best possible sound isolation and reduction of echoes.
Additionally, adjusting settings on our audio equipment such as equalizers or filters can further improve sound quality by minimizing unwanted frequencies or resonances.
Taking the time to test and adjust our setup will ultimately result in a home studio that provides an optimal recording environment with professional-level soundproofing capabilities.
Frequently Asked Questions
How much does soundproofing materials typically cost?
The cost of professional soundproofing materials can vary depending on the size and complexity of the project. However, DIY soundproofing methods are often more affordable and can be done using materials such as acoustic foam, mass-loaded vinyl, and weatherstripping.
Can I use regular foam insulation to soundproof my home studio?
Regular foam insulation may seem like a cheap and convenient option for soundproofing, but it is not effective in blocking sound. Professional soundproofing materials provide better alternatives, ensuring optimal acoustic isolation and improved recording quality.
Are there any alternatives to building a floating floor?
There are alternatives to building a floating floor for soundproofing without construction. Options such as mass-loaded vinyl, acoustic underlayments, and carpeting with thick padding can help reduce noise transmission in your home studio.
Can soundproofing windows also help with energy efficiency?
Soundproofing windows not only enhances energy efficiency but also reduces noise. Techniques like double glazing, weatherstripping, and using window inserts can effectively minimize sound transmission in apartments while optimizing insulation for better energy conservation.
How can I test the effectiveness of my soundproofing efforts?
To test the effectiveness of soundproofing, we can use various testing methods and soundproofing measurements. These techniques allow us to assess the level of noise reduction achieved and ensure that our soundproofing efforts are successful.
Conclusion
In conclusion, soundproofing your home studio is crucial for creating a professional and high-quality recording environment. By assessing your space, sealing air leaks, using soundproofing materials, and building a floating floor, you can create a space that minimizes external noise interference.
Soundproofing doors and windows, reducing noise from HVAC systems, and controlling reflections and echoes are also important steps to take. Remember the adage “Silence is golden” as you embark on this DIY project to ensure an enjoyable and productive experience in your home studio.