
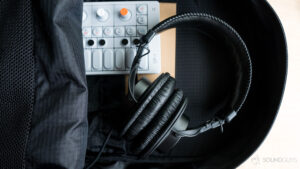
Headsets are essential devices that enable us to communicate and immerse ourselves in various audio experiences. However, with regular use, headsets can accumulate dirt, sweat, and bacteria, which may compromise their performance and hygiene. Therefore, it is crucial to know the best way to clean a headset effectively.
In this article, we will provide you with precise instructions on how to maintain your headset’s cleanliness and functionality.
Imagine a scenario where you put on your favorite headset after a long day at work or an intense gaming session. As you position the ear cups over your ears, you notice smudges and grime that detract from your overall experience. To avoid such disappointments, proper cleaning techniques should be employed regularly.
Cleaning a headset involves several steps that ensure optimal results. From gathering the necessary supplies to removing detachable parts and disinfecting with a suitable cleaning solution, each step plays a vital role in maintaining hygiene and extending the lifespan of your device.
Additionally, we will also provide tips for regular maintenance to keep your headset in pristine condition for years to come.
Key Takeaways What Is The Best Way To Clean A Headset?
- Regular cleaning with mild cleaning solution and microfiber cloth helps maintain headset cleanliness and optimal audio performance.
- Detachable parts should be removed for easier access to clean all surfaces, and non-detachable parts can be wiped with a microfiber cloth using mild soap/water or specialized electronics cleaning solutions.
- Cotton swabs can be used for cleaning small areas and intricate crevices, and they offer four alternative options for cleaning headsets.
- Ear pads and cushions should be cleaned regularly to prevent the buildup of oils and sweat, and the microphone should be cleaned with appropriate solutions and wiped with a mild cleaning solution or disinfectant wipe.
Gather Your Cleaning Supplies
To effectively clean a headset, it is essential to gather the necessary cleaning supplies. Cleaning hacks and DIY cleaning solutions can be employed for this purpose.
Firstly, a soft microfiber cloth should be procured as it is gentle on the headset’s surfaces and helps in removing dust and fingerprints without causing any scratches. Additionally, cotton swabs come in handy for reaching small crevices that are difficult to access with a cloth.
Isopropyl alcohol or disinfectant wipes can be used to sanitize the headset, ensuring that it is free from germs and bacteria. Furthermore, distilled water can be utilized along with mild soap for more thorough cleaning of the headset’s exterior parts.
Once these supplies are gathered, one can proceed to the next step of removing detachable parts without damaging them or the main body of the headset.
Remove Detachable Parts
Removing the detachable parts of a headset is crucial for ensuring proper cleaning and maintenance, eliciting a sense of responsibility in individuals towards their audio equipment.
Cleaning methods and techniques vary depending on the type of headset, but the general process involves disassembling the parts that can be detached. This allows for easier access to all surfaces, eliminating dirt, dust, and sweat that may accumulate over time. Before removing any components, it is essential to consult the manufacturer’s instructions to avoid damaging sensitive parts or voiding warranties. A 2 column and 5 row table can be used to categorize different detachable parts, such as ear cups, headband padding, microphone boom arm, cables/connectors, and ear tips/foam pads. Once these detachable parts are removed, they can be cleaned separately using appropriate cleaning solutions or wipes. Transitioning into the next section involves discussing how to wipe down the remaining non-detachable parts with a microfiber cloth.
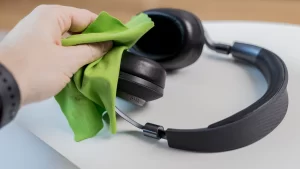
Wipe Down with a Microfiber Cloth
Using a soft microfiber cloth, the remaining non-detachable parts of the headset can be wiped down to remove any surface dirt or debris. This step is essential in maintaining proper hygiene and prolonging the lifespan of the device.
When cleaning, it is important to avoid using harsh chemicals or abrasive materials that may damage the delicate surfaces of the headset. Instead, opt for cleaning solution alternatives such as mild soap and water or specialized electronics cleaning solutions. These options effectively eliminate germs without causing harm.
By regularly wiping down the headset with a microfiber cloth, users can prevent headphone damage caused by built-up grime and ensure optimal audio performance.
Transitioning into the subsequent section about ‘use a cotton swab for small areas,’ further attention should be paid to intricate crevices and hard-to-reach places for thorough cleaning.
Use a Cotton Swab for Small Areas
In intricate crevices and hard-to-reach places of the headset, a cotton swab can be gently maneuvered to meticulously remove any lingering dirt or debris. This cleaning technique is particularly effective for small areas that cannot be easily accessed with a microfiber cloth alone.
Here are four alternative options for using a cotton swab in headset cleaning:
- Dampen the cotton swab with water or rubbing alcohol before wiping down the surface.
- Apply gentle pressure when using the cotton swab to avoid damaging delicate components.
- Rotate the cotton swab as you clean to ensure thorough removal of dirt particles.
- Use multiple cotton swabs if necessary, discarding each one after use to prevent cross-contamination.
By employing these precise techniques, users can achieve a meticulous cleaning outcome when targeting specific areas on their headsets.
Transitioning into the subsequent section about disinfecting with a cleaning solution, it is important to consider additional steps in maintaining hygiene and cleanliness.
Disinfect with a Cleaning Solution
To effectively sanitize a headset, it is essential to incorporate the use of a suitable cleaning solution that can eliminate germs and bacteria lurking on its surface.
Cleaning solution alternatives are available for individuals who prefer to disinfect their headsets without chemicals. One option is to mix equal parts of water and rubbing alcohol in a spray bottle. This solution can be sprayed onto a clean cloth and gently wiped over the headset’s surfaces, ensuring that all areas are covered.
Another alternative is to use hydrogen peroxide, which possesses strong antimicrobial properties. It is important to follow the manufacturer’s instructions when using these cleaning solutions to avoid damaging the headset.
After disinfecting with a cleaning solution, it is crucial to pay attention to the ear pads, as they may require separate cleaning or replacement due to prolonged contact with sweat or oils from the skin.
Pay Attention to the Ear Pads
It is imperative to give careful consideration to the ear pads, as they may necessitate separate cleaning or replacement due to prolonged contact with sweat or oils from the skin. Cleaning ear pads regularly is essential to maintain hygiene and prolong the life of your headset.
To clean the ear pads, start by removing them from the headset if possible. Gently wipe the surface of the pads using a soft cloth dampened with a mild cleaning solution. Avoid getting any liquid inside the ear cups as it can damage the internal components.
If the ear pads are not removable or have become worn out over time, replacing them with new ones is recommended for optimal comfort and audio performance.
Moving on to another important component, let’s discuss how to clean the microphone without damaging it or affecting its sound quality.
Clean the Microphone
One crucial aspect to consider is the proper maintenance of the microphone in order to ensure its longevity and optimal sound quality.
The microphone on a headset can accumulate dirt, sweat, and bacteria over time, which can affect its performance and hygiene.
To clean the microphone, it is important to use appropriate cleaning solutions that are safe for electronic devices. Avoid using excessive moisture or harsh chemicals that may damage the delicate components of the microphone.
Proper disinfection can be achieved by wiping the surface of the microphone with a cloth dampened with a mild cleaning solution or disinfectant wipe.
After cleaning, it is essential to let it dry completely before using it again to prevent any potential damage from moisture.
Transitioning into the subsequent section about ‘letting it dry completely’, it is important to ensure thorough drying in order to maintain its functionality and prevent any potential issues.
Let it Dry Completely
After thoroughly cleaning the microphone of your headset, the next critical step in maintaining headset hygiene is to ensure that it dries completely.
Drying is a crucial aspect of the cleaning process as moisture can promote the growth of bacteria and fungi, which could potentially damage the device and compromise sound quality.
To achieve optimal drying, it is recommended to disassemble removable parts such as ear cushions and detachable microphones. Place these components on a clean, dry surface or use a soft cloth to absorb excess moisture gently.
Additionally, you can utilize gentle airflow from a fan or low heat setting from a hairdryer (if applicable) to speed up the drying process.
Once all components are dried thoroughly, you can proceed with reassembling your headset for continued usage in pristine condition.
Reassemble the Headset
To properly reassemble the headset, carefully align and connect each component, ensuring a secure fit and seamless integration for optimal performance.
Begin by attaching the ear cups to the headband, making sure they slide into their designated slots.
Then, insert the speakers into their respective housing, ensuring they are facing the correct direction.
Next, reconnect any detached wires according to their color-coded markings or connectors. It is important to follow the manufacturer’s instructions when handling delicate components or intricate wiring systems.
If any issues arise during reassembly, troubleshooting techniques such as checking connections and consulting user manuals can be helpful.
Once reassembled, it is essential to proceed with regular maintenance tips to keep the headset clean and functioning optimally.
Regular Maintenance Tips
Regular maintenance is essential for prolonging the lifespan and ensuring optimal performance of your headset. Preventive measures should be taken to keep the headset clean and free from debris. One common mistake is using abrasive materials or harsh chemicals, which can damage the delicate components of the headset. Instead, a soft cloth or cotton swab dampened with a mild cleaning solution should be used to gently wipe away dirt and grime. It is important to avoid getting any moisture into the openings or ports of the headset, as this can cause electrical damage. Additionally, regular cleaning of ear pads and cushions is recommended to prevent buildup of oils and sweat, which can affect both comfort and sound quality. Following these simple maintenance tips will help ensure that your headset remains in top condition for years to come.
| Common Cleaning Mistakes | Preventive Measures | Recommended Cleaning Solution |
|---|---|---|
| Using harsh chemicals | Use gentle materials such as soft cloth or cotton swab | Mild cleaning solution |
| Getting moisture into openings or ports | Be cautious while cleaning near openings or ports | Dry cloth or cotton swab |
| Neglecting ear pads and cushions | Regularly clean ear pads and cushions | Mild soap solution followed by drying |
Table: Maintenance Tips for Headset Cleaning
Frequently Asked Questions
How often should I clean my headset?
Headsets should be cleaned regularly to ensure optimal performance and hygiene. The frequency of cleaning depends on usage, but a general guideline is every 1-2 weeks. Use appropriate cleaning products, such as alcohol wipes or mild soap, to gently remove dirt and bacteria.
Can I use soap and water to clean my headset?
Using soap and water to clean headsets is not recommended as it can damage the electronic components. Instead, use a microfiber cloth or alcohol wipes to gently remove dirt and bacteria.
Can I use disinfecting wipes to clean my headset?
Disinfecting wipes can be used to clean a headset, but caution must be exercised as they can potentially damage the headset’s delicate components. Alternative cleaning methods such as using isopropyl alcohol or mild soapy water may be preferable.
Should I clean the ear pads separately from the rest of the headset?
When cleaning a headset, it is advisable to clean the ear pads separately from the rest of the headset. This allows for more focused cleaning and ensures that the ear pads are properly maintained. Cleaning solutions specifically designed for electronics can be used for this purpose.
How long should I let my headset dry before using it again?
To properly dry a wet headset, it is recommended to first wipe off any excess moisture with a soft cloth. Then, allow the headset to air dry naturally in a well-ventilated area for at least 24 hours. It is not advisable to use a hairdryer as it may cause damage to the electronic components.
Conclusion
In conclusion, the process of cleaning a headset requires careful attention to detail and the use of appropriate cleaning supplies.
By following the steps outlined in this article, one can ensure that their headset is thoroughly cleaned and maintained.
Regular maintenance is crucial for prolonging the lifespan of the headset and ensuring optimal performance.
As the saying goes, ‘A clean headset is a sound investment,’ so take the time to properly clean and care for your device to enjoy crisp audio quality for years to come.